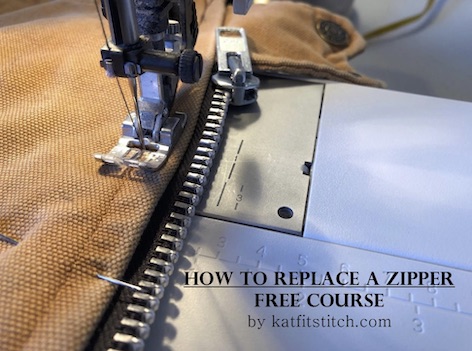
WELCOME

Hello, my name is Kathleen Morris I will be your instructor for this free course. I’ve been sewing professionally for over 30 years.
I worked for a professional sewing company making business suits for men and women.
I was also an Assistant Manager for a major fabric store where I gained a lot of experience and knowledge in the textile industry.
I’ve sewn for sports teams and constructed casual wear for a popular home-based business that grew to become a leading competitor in the clothing industry.
I also have experience running my own home-based sewing and alteration business. I’ve sewn and altered everything from wedding dresses to leather jackets and everything in between.
Currently, I write sewing tutorials, books, and do sewing videos on Youtube.
In this course, you will learn how to take out an old zipper in a jacket, and replace it with a new one. You will become confident enough with this new skill to use it in your own alteration business, or simply for your own sewing purposes.
PREREQUISITES
You will need to know your way around a sewing machine. This course is not for first-time sewers.
You will need to know the basics. We will go over basic knowledge info but this course is meant for those who have intermediate sewing skill levels.
For all intents and purposes, this course will focus on replacing a zipper in a heavy work jacket and use samples accordingly.
You will need the following SUPPLIES.
ZIPPER BASICS
SIZES AVAILABLE
There are many different sizes of zippers on the market.
You can buy zippers by the meter at wholesale fabric stores or upholstery stores for your projects like sleeping bags and tents.
Or, you can buy single zippers anywhere.
It doesn’t even have to be at a fabric store. Zippers at Walmart are just as good as zippers that you buy online or at a fabric store.
Make sure you measure your garment properly before buying your zipper. It’s always good to purchase zippers that are a little longer rather than a little shorter.
If you can bring your garment to the store with you, you can match the zipper better. I would highly recommend that you do that.
If you’re putting a zipper in for a client, be sure to check with them on color, thickness, and length.
If they are up for it, they can either buy a zipper for you or come along with you to the store and pick one out.
If you’re replacing a zipper for your own garments, you won’t need to be so particular unless you want to be.
THREAD TYPES TO USE
When you replace a zipper, you want to make sure that the thread matches the jacket that you are working on. That goes with any garment that you work with.
If the jacket is dark, you can get away with using black even if it’s a brown jacket. It depends on the look of the jacket and the specifications of your client. If they don’t care, then you don’t have to worry about the color or the type of thread.
Just use whatever suits the project best. Some people think that you have to use a special kind of thread for heavy jackets. They think you have to use heavy thread, but that isn’t always the case.
t depends on how the jacket is constructed. If you see the jacket you’re working on has a heavy coarse thread, then match it up.
The worst thing that you can do is use a heavyweight thread when the jacket clearly has a lightweight thread or vice versa. It will look mismatched and not professional.
THICKNESS OF YOUR ZIPPER
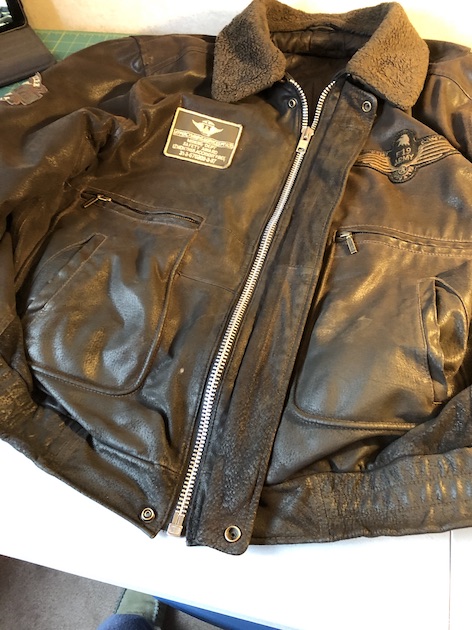
I recently replaced a lightweight zipper with a heavyweight zipper in a leather jacket for a client. He specifically wanted something thicker that would last long instead of breaking all the time like the lightweight zipper kept doing.
In a case like this, you want to get exactly what the customer is looking for. I purchased a heavy zipper which worked wonderfully with the leather.
Heavy zippers stick a bit though, so be prepared to smooth the slide after you finish setting it in. A little bit of wax will do the trick.
TYPE OF JACKET
The type of jacket you are replacing the zipper in is very important.
If it’s a children’s winter parka, you will want to get a heavy plastic zipper.
f the jacket you’re working on is a lightweight over-jacket, you will want to get a lightweight zipper.
Choosing the right zipper for the right project is key to a successful zipper replacement.
SEWING SUPPLIES
You will need a good seam ripper. Some people have had the same dull seam ripper for years. Don’t be that person. Throw it out. You want to make sure that your seam ripper is sharp enough to get through whatever thick layers you’re picking apart.
You will also need a good pair of scissors, a measuring tape, thread, tailor’s chalk, tape, and pins. Of course, you will need scissors as well. Make sure your sewing machine is able to do the job.
Some machines labor over the heavy fabric like leather or tough outerwear. If your machine balls up with thread when you go over the simplest of things, don’t use it for zipper replacement.
I find that older vintage sewing machines do really well going over thick material like zippers, as do industrial sewing machines and machines specifically made for leather projects.
However, if you don’t have one of these and you want to use the sewing machine you have, it’s still doable. All you have to do is go steady and sure and it will be just fine.
I recently used my domestic Pfaff sewing machine to replace a zipper in a leather jacket and even though it labored, it still got the job done well.
GETTING READY
SEWING MACHINE SETUP
You will want to make sure that you set up your sewing machine well ahead of time before you get your zipper ready for replacement. The reason I say this is because when you’re replacing a zipper for a client, you will want to work as fast as possible.
Sometimes they want their zipper replaced the same day. Sometimes you’ll have a bit longer like a week or so, but it’s the time that it takes you that determines how much you’ll get paid.
We’ll go over that later on in the course in the business section, but for now, I just want to make sure that you understand that preparation for zipper replacement is just as important as the actual zipper replacement.
If you don’t plan out your project and you don’t prepare everything, like setting up your sewing machine, zipper foot, and thread and bobbin, a job that should only take you two hours could end up taking you the entire day.
That’s not good if you’re only getting paid a small amount. So, learn to set up your sewing machine well in advance, before you even start the project.
TYPES OF MACHINES
As I mentioned before, there are different types of sewing machines that work better for zipper replacement. I’ve worked on all kinds of industrial sewing machines that work wonderfully for zipper replacement, but not everyone can afford an industrial sewing machine.
They can run you into tens of thousands of dollars. Instead, you can look for used industrial sewing machines or sewing machines made for leather, or even vintage sewing machines.
I recently reconditioned a vintage Elna sewing machine that worked beautifully with heavy-duty material like leather, vinyl, and canvas. You can find the article at the link, Vintage Elna.
I work on a Pfaff sewing machine and it is pretty heavy duty even though it’s a domestic machine.
All you can do is try using the machine you have to see if it will get the job done. There is no need to go out and buy a new machine just to replace a zipper in a jacket.
Use what you have and save some money.
THREADING YOUR MACHINE
Threading your machine is basic knowledge for those who are intermediate sewers. The only reason I wanted to mention this part is that a lot can go wrong if we thread a sewing machine improperly while replacing a zipper.
If your tension isn’t right, you will have skipped stitches that will cause your zipper to either pucker or come apart at the seams. You don’t want that.
You don’t want the thread to get all balled up either, or have imperfect stitches when you replace a zipper. So, make sure your machine is threaded properly and tested, to be sure it can do the job well.
BOBBIN SETUP
Bobbin setup is just as important as ensuring your machine is threaded properly. If you use different thread in the bobbin, and different thread on top, you will create problems with your tension.
So, make sure you use the same thread in your bobbin as you do on the top of your machine. Make sure the bobbin is inserted into the machine properly as well, and then test it out.
NEEDLE SIZES AND POSITIONS
If you are sewing a heavy jacket, you will want to use a thicker needle. If you are sewing a lightweight jacket, you will want to use a thinner needle.
Mostly, it’s common knowledge to those who have been sewing for a while, but I just wanted to mention it because it does make the job easier if you don’t keep breaking your needle.
Can you use thinner needles on a heavier project? Yes! But that doesn’t mean you should. You don’t want to have to go out and buy new needles when you’re on a time crunch to get an alteration done.
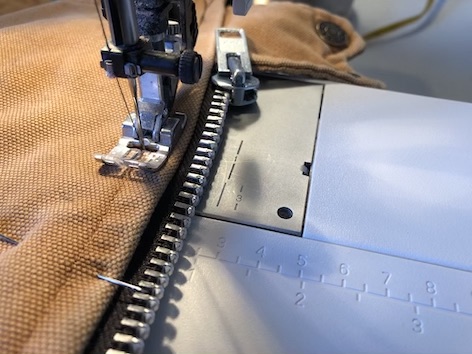
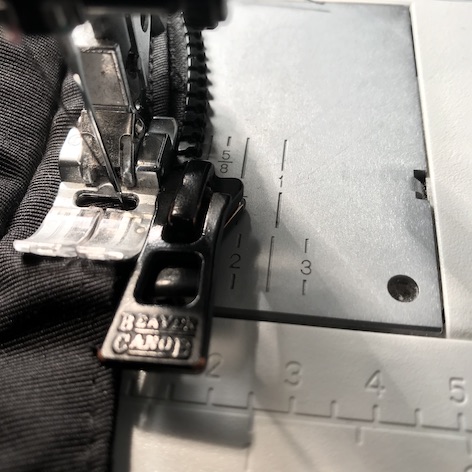
SEWING MACHINE FEET
Using the correct sewing machine foot helps for speed and accuracy, but with my experience, I have found that you don’t necessarily need to use a zipper foot.
In fact, I actually like to use a regular sewing machine foot. All I do is move the needle from side to side. It isn’t really that difficult to maneuver the zipper underneath a regular foot.
The choice is yours whether you use a regular foot or a zipper foot. Either way, the job will still get done and it will look beautiful.
TYPES OF JACKETS
LEATHER JACKETS
Leather can be very difficult to sew through even if it feels very soft to the touch, it can be deceiving.
Make sure when you’re replacing a zipper in a leather jacket that your machine can actually sew through the layers.
If you can’t and it’s your only machine, you may have to say no to the zipper replacement project. Leather jackets can also be very delicate.
Most people would never assume that is the case, but I have had leather rip on me when doing alterations. So be careful especially if the leather is very old.
Leather jackets can also be very sticky going underneath your presser foot.
It’s a good idea to work in stages when replacing a zipper in a leather jacket because that will allow you to move your presser foot around so that it doesn’t get stuck in one place.
SEASONAL JACKETS
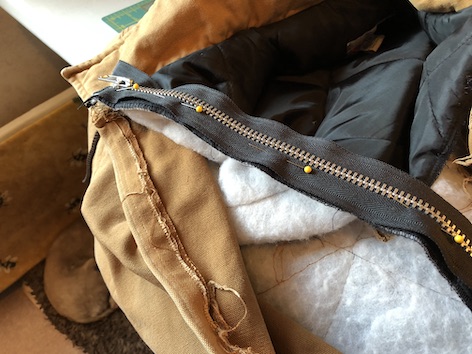
Seasonal jackets like winter coats can be a challenge when replacing the zipper. They have many layers and you have to figure out not only the deconstruction of the jacket but the reconstruction of it as well.
A good way to remember how a jacket goes is to take a picture of the construction.
We will talk about that later in more detail, but for now, I just wanted to mention that there are ways to help you work with a leather jacket and it’s multiple layers.
You will also want to make sure that your sewing machine can sew through all those layers first before you accept the challenge of replacing the zipper.
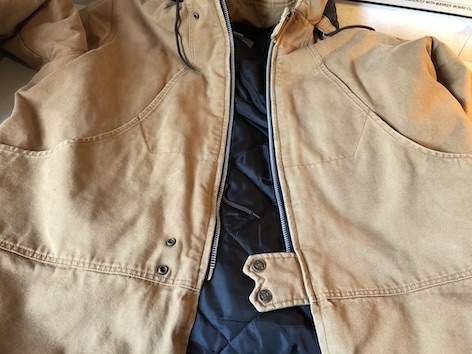
HEAVY WORK JACKETS
Work jackets are also a challenge when replacing the zipper. They are bulky underneath your presser foot, and hard to maneuver through your machine.
These types of jackets take extra time and care to do. You will have to work in stages and make sure that your machine can actually get through the layers.
The materials in these jackets might very well be canvas, vinyl, or even plastic.
CASUAL AND DRESSY JACKETS
Casual and dressy jackets are just like sewing any kind of garment. There really is no challenge to these types of jackets except for the fact that you want to make sure there are no flaws in your zipper replacement.
If you skip a stitch or sew the zipper in crookedly, it will be very noticeable on a dressy silk jacket for example.
Make sure you use the appropriate thread as well because a silk jacket will require silk thread rather than heavy denim thread like a jean jacket would require.
JACKET SIZES
The size of the jacket will determine how much you get paid when you replace the zipper.
We will discuss pricing in more depth in the business section of this course, but for now, I just wanted to mention that smaller kids’ jackets may only take you a half hour to replace a zipper, whereas a heavy-duty work jacket will take you three hours or longer.
That is a huge difference when considering replacing a zipper in a jacket.
Jacket sizes also will determine the length and cost of the zipper. A shorter zipper for a child’s jacket, for example, does not cost the same as a longer zipper in an adult winter coat.
Make sure you ask what size the jacket is before accepting the job of replacing the zipper, and give your clients an appropriate estimate accordingly.
OBSERVING THE JACKET
BASIC CONSTRUCTION
Before starting as a zipper replacement project, you will want to observe the jacket first. You want to take a look at how the basic construction of the jacket looks.
Some jackets have a visible lining, and some jackets have a hidden lining. I like to take a good length of time observing how a jacket is actually constructed before I start ripping it apart.
Once it’s apart, you may not know how to put it back together again if you don’t examine the basic construction first.
COLOR OF THREADS AND ZIPPERS
Colors are important to some people and not to others. By that, I mean that if you’re working on a zipper replacement for a client, you will want to check with them on what their preferences would be.
When I replaced a zipper in a leather jacket for a client, he didn’t care that the zipper was black and the jacket was brown.
If the jacket was mine, I would have chosen a brown zipper to match the brown leather. I also would have chosen a gold zipper, rather than the silver one he wanted.
The one I ripped out of the jacket was a brassy toothed zipper. But as I said, everyone is different. Just be sure to communicate that with the client you’re doing the work for.
Being proactive with communication in any business is a whole lot better then backpedaling to fix a problem or deal with a complaint.
You usually end up with a dissatisfied customer that won’t come back to you again or having to give them a refund for something that took you hours to do. We want to avoid that at all costs.
LOOK AND STYLE OF THE JACKET
The look and style of the jacket will determine how you sew the zipper in.
When we’re talking about observing the jacket before we start taking it apart, we want to make sure we understand what look we are going for first.
Take for example at a hidden zipper. If you’re replacing a zipper in a stylish dress jacket in a pocket with a hidden zipper, you want to construct that in a different way.
Firstly, there is no exact method that you would follow. By that I mean, sure you can follow the instructions on how to put it in, but not in that particular garment.
That garment may be constructed differently than anything you’ve ever seen before.
So, observing the construction of that particular jacket is imperative to how you will figure out a zipper replacement specifically for that look.
We don’t often come across these types of zipper replacements, but from time to time you will get a client that will want something unusual.
PHOTOGRAPHY MAP SETTING FOR SEWING
With unusual garments, comes unusual techniques.
When considering zipper replacement for something out of the norm, no matter how long you spend observing that jacket, you will never remember how it goes back together, or how it is supposed to look, if you don’t take pictures to map out the process and the look.
I have used this technique not just with zipper replacements, but with other types of sewing and alterations as well.
Sometimes you may come across a complicated wedding dress alteration that requires a lot of pictures to remember how exactly it goes back together.
We, seamstresses, are not miracle workers. From time to time we need a little help to remember how it goes back together and how it is supposed to look. And that’s okay.
DECONSTRUCTION
SEAM RIPPER TECHNIQUES
Deconstruction is my favorite part of zipper replacement. I don’t know why, but I just love the sound of a seam ripper going through the fabric.
It can be a daunting task, and pretty scary if you’ve never done it before, but in the end, you’ll find that it wasn’t as bad as you thought.
There are different techniques to using a seam ripper that I’d like to discuss and that is determined by how the zipper is sewn into the garment.
If it’s sewn in with a serger, it may be more difficult to pick out. Or it may be easier. There’s never a perfect answer because every garment is different.
Just start picking and you will quickly see how the whole thing is going to come apart. Sometimes when you pick on one side, the other side will just easily come apart.
Sometimes you can start picking something and slowly rip away at threads. Be very careful with this method because you can actually rip the jacket if you’re not careful.
DEALING WITH LININGS
When you start deconstructing a jacket you will quickly see how it was put together. Many a time with linings, you will have to match up those lining with seam allowance and thread, etc.
You will have to do your very best to reconstruct it to look as closely as possible to how it originally looked. Linings can sometimes be tricky but like all kinds of alterations, you just have to muddle through the best you can.
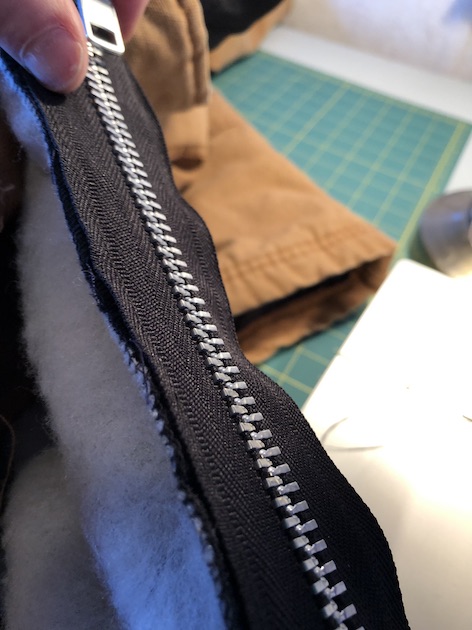
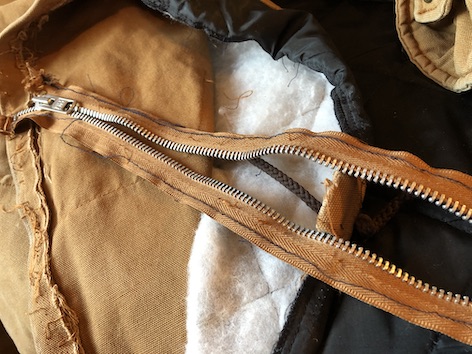
REMOVING AND EXAMINING THE ZIPPER
Once you have the zipper out of the jacket you will want to examine it. You will want to measure it and compare it to the zipper that you purchased.
You will want to check the teeth to see if there was something wrong with it. That’s important to know because it may be that it was rubbing on a certain part of the jacket causing it to break.
You will want to adjust that part of the zipper when you sew in the new one so it doesn’t break again.
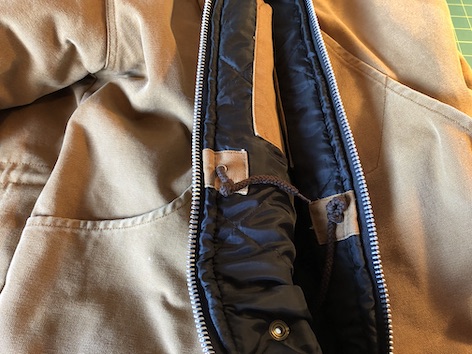
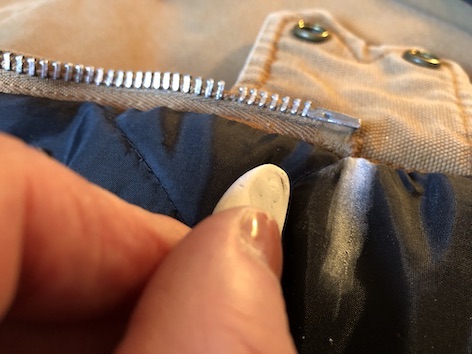
OBSTRUCTIONS IN THE ZIPPER
Sometimes jackets have snaps and obstructions in the actual zipper area that need your attention. You have to figure out a way to insert the new zipper around a snap because you won’t want to take that snap out.
Taking a snap out of a jacket is the worst thing to do. It will never look the same no matter what you try. The rule of thumb is to retain the integrity of the jacket.
That means you want it to look the same as it did before you replaced the zipper. What I like to do is cut around the snap. I measure the amount of space the snap takes up in the zipper area and then I cut that part right part out of the zipper.
Sometimes snaps invade the zipper area where you’re supposed to sew and it can be baffling to figure out how to get the zipper in. But rest assured it CAN be done and still look professional.
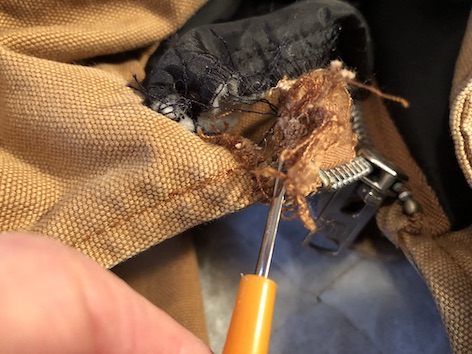
CLEANUP AND PREP
Your final step in the deconstruction process is clean up and preparation for inserting the new zipper. You will want to pick out every thread from the zipper pathway and clean up all loose threads from the area.
If you don’t, when you sew in the new zipper, old threads can peek out and look ugly and unprofessional. So, take your time and clean up the area as much as possible.
That zipper pathway must be free and clear of all loose threads so the new zipper will go in quick and easy.
SETTING IN THE ZIPPER
MEASUREMENTS
You want to measure the zipper once out and compare it to the measurement of the new zipper that you purchased. It may be a little longer or a little shorter but it should be very close to the one you took out.
If the zipper you took out is much longer than the one you are putting it. You may need to buy a new zipper.
It’s always better to purchase a zipper that is a little too long for the project, then too short you can always cut a zipper, but you can’t link been one.
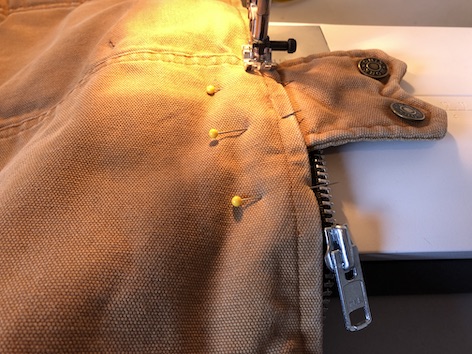
SETTING IN PINS
Depending on the type of jacket, you may want to use pins to hold the new his zipper in place before you sew it in. If you are working on a leather jacket, pins may not be the best thing to hold it in place.
Pins can sometimes get stuck in leather to the point that you can’t take it out with anything better pliers for your teeth if you dare. I’ve had that happen to me and it’s not very fun.
I didn’t realize that even if I got a pin in leather. I wasn’t able to get it out. If you are working with a lighter jacket, pins work just fine to hold this new zipper in place before sewing.
You will just want to work in sections as you set in the zipper. If you do it fast it may be canned sloppily and then once you come to the actual sewing part, it may go in crookedly.
So, take your time through this process and ensure the zipper goes exactly where you wanted to be when you sew it in. Be sure to remove each pin as you slowly so the zipper on.
This is not one of those times when you can so over a pin. Sewing through pins is a technique that’s allowable when dealing with lighter weight fabrics and easier projects light dressmaking.
But when you replace a zipper in a jacket, you are dealing with many layers as well as the pin. I like to remove the pen as I get close to it rather than sew over it because too much can go wrong if you don’t.
I’ve seen needles break. I’ve seen threads get tangled. I’ve seen tension go out of whack. Like I said. Too much can go wrong if you sew over pins that hold the zipper in place. So just don’t.
CLAMPING ALTERNATIVES
A seamstress can use clamps to hold a zipper in place instead of pins. Some like to use regular wooden clothespins, of tiny plastic clothespins to get the job done.
This technique works especially well on very thick heavy-duty jackets. It allows all the layers to talk in well and stay there until you’re ready to sew the zipper in.
FINGER TECHNIQUES
If the jacket is not heavy-duty or leather, I like to use what I call the finger technique. A process where you just hold the zipper in place with your fingers as you sew.
It takes a lot of practice to use this technique, but it allows you to get a zipper replaced very quickly. You have to be sure you can accurately do this otherwise I would skip this technique and pin instead.
But the choice is up to you, whichever way you were comfortable with is the best way to do it. There really is no right or wrong way to sit in the zipper.
TAILOR CHALKING
I like to mention tailoring chalk because it’s a great way to mark where you want your zipper to be pinned.
I don’t often do this, but if you’re sitting in a new zipper for the first time, you may want to draw a line where the zipper needs to go so you can keep it as even as possible.
BASTING TAPE TECHNIQUES
Basting tape is often used to set a zipper is into a project before sewing it in. This technique only works if the zipper is lightweight and the project is lightweight.
If you try to use basting tape on something like a zipper replacement in a leather jacket, you will be sadly disappointed.
Basting take will not hold layers of fabric in place. It will quickly fall apart if you move it the wrong way and that’s just not good. So, keep that basting tape for lightweight projects.
SNIPPING THE ZIP
If you purchased a zipper that is too long for your project you will have to cut it before inserting the zipper into Jacket.
If you cut through the teeth in the wrong area you will ruin the zipper and have to purchase a new one. There is no way around it.
I have seen people click through the teeth of a zipper by accident and then try to use that zipper. It will never work. Give it up and go buy a new one. Zippers are not that expensive.
You want to do a professional job so if something happens like this. Then simply go out and get an identical zipper.
You will want to cut off the ends of the zipper to insert it into the top or the bottom of your zipper, but you don’t have to.
t depends on the length of the zipper and what that zipper looks like. Some zippers have a clickable insert at the top. You can actually leave it there until the zipper is almost fully sewn in.
That’s what I like to do just in case I flub up. I don’t want to cut too soon just in case I measured incorrectly. And it doesn’t matter how many years you been sewing, accidents can happen to anyone.
Be careful when and where you snip the zip so you don’t have to go out and buy a new one.
FINAL PREP AND EXAMINATION OF ZIPPER INSERT
Once you have the entire zipper laid to the new pathway, you will want to examine how it looks. If pinned, or clipped in place properly, the zipper should look like the old one.
You should even be able to zip it up. Test how it looks. Test the seam allowance. Make sure the zipper head has enough room to slide properly. Test! Test! Test!
If it doesn’t look good, or if the zipper head doesn’t slide well, do it over. When I worked as a seamstress for a garment company, if something wasn’t absolutely perfect, a supervisor would come over and either start a pick-apart do-over pile or make me start all over again.
That’s just the way it is when you sold for other people. Even if you’re only sewing for yourself, you want your garment to look good. If it doesn’t look good, doing over. Pick it apart even if it takes you hours. The payoff is huge even if you don’t make a dime.
THE SEWING PROCESS
TECHNIQUES
There are many techniques to sewing a zipper in. Don’t let people intimidate you by saying you’re doing it incorrectly. It’s like cleaning the house.
I have my way of cleaning the house, and my husband has his. Does the house get cleaned either way? Yes of course! He’s a good house cleaner and I’m fortunate to have a husband that actually helps, but my point is let’s not get caught up in logistics.
If you take your time and sew slowly, that’s up to you. Just because someone does it fast doesn’t mean they do it better. Techniques depend upon the individual and that’s it. No special formula.
GOING AROUND OBSTRUCTIONS
As I said before, when you have a snap very close to the zipper, I like to cut out an insert in the zipper fabric and then insert it.
When I sew the zipper in, it makes no difference that I have clipped that part away, and nobody is the wiser. Once it’s sewn in, you can’t even tell.
Sometimes you have to move the needle from side to side so you don’t hit the snap, or button, or whatever is in the way, but that’s it.
Going around objects is not as difficult or intimidating as people think. Just observe whatever object is in the way, evaluate it, and come up with a plan that will work.
Be confident in your decision, and make it unnoticeable. You can do it!
THICK LAYER PROCESS
When you’re replacing a zipper in a leather jacket, for example, you will have a lot of thick layers to go through. You may not be able to sew the zipper in all at once.
I like to avoid thick areas, and sew the thin areas first, even if I have to join seems together. Some seamstresses don’t like this method but really, it’s not even noticeable.
Some like to sew all one seam when they insert a zipper. But if you’re matching your thread it shouldn’t be a problem to stop and start throughout the sewing process.
So, rather than start a project where it begins, leave that area if it’s too thick. Start a quarter of the way down and come back to the thick part later. I do this often, and what that does is it gives you confidence that the project will work by seeing the actual step by step progress.
When I replaced a zipper in a leather jacket, I wasn’t sure how it would look until I saw it coming together. Once the zipper stabilized in the jacket, I was more able to dive into the thick area and make it work.
It’s kind of a mind game. Trick your brain by seeing progress, then come back to the hard stuff later and it will all work itself out. Just be sure to go slowly and join seams together.
You don’t want to have a crooked seam on a zipper. You will also want to go over the top part and the bottom part of your zipper several times to make it sturdy and durable. Reinforcement is key. You don’t want the end of the zipper ripping out after a lot of use.
STITCH IN THE DITCH
I like to stitch in the ditch when I replace a zipper. I know it’s a quilting term, but I use it anyway. When you pick apart the zipper, you will see the old sewing line.
That’s what I call the ditch. When you put the new zipper in, I like to follow that same sewing line. What that does is fool the eye into thinking it was never replaced in the first place.
No one can even tell what I did because that seam is so dead-on the old sewing line that you can’t even tell it’s a new sewing line. Stitch in the ditch, always!
SPEED AND ACCURACY
When you replace a zipper in a jacket for clients, you want to make sure that you do it in a timely manner.
As I mentioned before, if a project should only take you a couple of hours and you took all day, your alteration business won’t be profitable.
Imagine the opportunity of doing three or four jackets in a day. You could make a lot of money but not if it takes you three or four times longer than it should for each jacket.
So make sure you do things as quickly as possible yet as accurately as possible.
Nobody is going to hire you to do a sewing project or an alteration like replacing a zipper in a jacket if you tell them you can get it back to them in a half-hour, yet deliver them a sloppy mess.
They won’t care that you did it quickly, only that you did a bad job. So, take your time, do a good job, and learn to find a happy medium between speed and accuracy.
TIMING WHILE YOU SEW
It’s good to keep track of how long it actually does take you to do a project. Let’s take for example this course subject.
When you replace a zipper in a jacket, record how long it takes you. Do it a few more times and record that.
Take the average and you’ll have the amount of time it actually takes you to replace a zipper. If that’s three hours, then charge accordingly.
Don’t undercut the actual time needed for the project. Most home-based sewing businesses do this.
They want to get the work so they undercut themselves and that’s not a good business practice. Get paid for the actual work you do and don’t be afraid to charge for it.
TO USE A ZIPPER FOOT OR NOT
A lot of people think the zipper foot is the be-all and end-all of sewing when replacing or inserting a zipper into a garment. You may not like to use a zipper foot at all.
That is perfectly okay. Just because you don’t want to use a zipper foot doesn’t mean that you’re a bad seamstress. Use whatever you’re comfortable with.
If that means using your regular presser foot, then do it. I don’t like to use a zipper foot. That’s just me. We are all different and that’s okay.
Whichever presser foot you decide to use, just make sure you do a good job. That’s all that really matters. I just move my needle side to side when I use a regular presser foot. It works just fine.
ONE SIDE AT A TIME
It’s important to note that when you replace the zipper in a jacket you will be doing one side at a time.
I suppose if you’ve never sewn a zipper in a jacket before, you may think that you need to zip it up first before you sew. That is not the case.
With a zipper that separates at the bottom, you will insert it one side at a time. That’s the easiest and best way to do it. I can’t tell you enough, how amazing you will feel when you see that first side set in.
I remember the first time I did it I was overjoyed. As soon as I saw the first side completely done, I immediately felt confident enough to complete the rest of the job, and it looked quite good I might add.
Yours will too! Confidence is everything!
BEGINNING & ENDING THE ZIPPER
TOP AND BOTTOM FINISH
When finishing the top of the zipper, I like to tuck the excess into the pocket at the top.
If it’s the exact size you can just sew it right up to the end. Often times it’s not exact so tucking it in is a great way to hide the end.
For the bottom, you will want to make it exact. You will want to make the bottom match where the jacket ends exactly.
Both sides of the zipper must match when done. If not, pick apart and redo it until it completely matches with the other side.
FOLLOWING THE LINES
As I stated before, you should follow the sewing lines where you picked it apart. It will look finished, giving the zipper a professional quality.
Be sure to check for loose threads from the deconstruction process, and clip off any threads leftover as well.
You want a clean, finished looking project for your client when you hand it over to them.
FOLLOWING YOUR PHOTO MAP
Now is the time to check those photos you took when the old zipper was in. You want to compare them to how the jacket looks now with the new zipper.
If something looks out of whack, you will need to fix it. Always take apart something that doesn’t look right and fix it.
If you run an alteration business, or a garment making business, your integrity is on the line if you don’t.
You always want to promote your professionalism so that customers will keep coming back.
ACCURATE ZIPPER SLIDE
If you insert a heavy metal zipper, sometimes you have a hard time zipping it up. It can be very sticky when it’s new.
You may have to help it along with a little bit of wax. I’ve also used a tiny bit of oil on a cloth and rubbed it on the zipper to make it slide smoother.
You want to be careful though because you don’t want to dirty the garment. You just want the zipper to slide better and that can be easily achieved by this method.
If you don’t want to put anything on the zipper then you can just run it up and down over and over until the slide is smooth.
FIXING MISTAKES
EVALUATING THE MISTAKES
I think this is the hardest part of sewing. None of us are perfect and there’s bound to be a mistake or two once in a while.
Don’t beat yourself up if this happens. It’s normal. Just make sure you fix whatever the problem is. In order to do this, you need to evaluate your mistake first.
Let’s take for an example what happened to me. When I replaced a zipper in a leather jacket, part of the leather tore. It was only a tiny area right beside the zipper, but still noticeable.
I knew I had to fix it, but I had to figure out how first. That meant evaluating the entire jacket to see how it was constructed.
IMPROVISING
You need to improvise when you do alterations for people, especially when you make a mistake and tear the fabric as I did.
I noticed a certain sewing design in the leather that I could incorporate into my mistake. I made my mistake look like it was supposed to be there.
It’s a clever technique that all seamstresses can do if they put their minds to it. In fact, clients need to know that these things happen and are normal. Alterations are not a perfect science.
Whenever you put something new into something old there is bound to be a challenge or problem. Improvising is the only solution to fixing your mistakes.
COVER TECHNIQUES
There are many types of cover techniques that you can use to fix a problem. Going with my example, I decided to use a leather patch inside the lining of the jacket to stabilize the rip.
Then, I was able to create a seam and topstitch it down where the rip appeared. I incorporated it into the zipper, and once it was done you couldn’t even tell it wasn’t supposed to be there.
TELLING THE CLIENT
Yes, you have to tell the client. They won’t like it at first, but once they see it, nine times out of ten they won’t even care.
If it’s a picky person, they may not want to pay you for it, but as I said, nine times out of ten they will be totally okay with it. If that one person doesn’t want to pay, then so be it.
It’s far better to keep the client happy than to lose them. But sometimes, no matter what you say or do, you won’t be able to keep them from going elsewhere. It is what it is.
Always be sure to let your client know that alterations are not a perfect science and things do go wrong from time to time. If you prepare them ahead of time, it’s a lot easier to tell them when a mistake happens.
BUSINESS PRACTICES 101
CUSTOMER SERVICE
Customer service is the most important part of any business. I have years of customer service experience, and I can tell you if you don’t treat people well, they won’t come back to you.
That goes for anyone who wants to start a sewing and alteration business. If you think you’re going to argue with a client or overcharge them or tell them off, think again.
If you don’t get into the practice of treating them like gold, they will take their business elsewhere and spread it all over social media as well. It only takes one bad apple to spoil the bunch.
end over backward for your clients and do whatever they want you to do. They are your bread and butter.
LIABILITIES AND LEGALITIES
If you are running a sewing alteration business you will want to get Insurance.
You might not need to when you just start out, but as you progress in your business taking on higher-paying clients and more complex work, you will want a safeguard for yourself.
By that I mean, insurance for when you screw up. As I said before no seamstress is perfect no matter how long they’ve been sewing. It doesn’t matter how experienced you are either. Accidents happen and that’s just normal.
Take for example, you might be commissioned to sew a wedding gown. The customer spent a small fortune on rare exotic silk. She delivers it to you, entrusting the expensive fabric to you, and then something goes wrong in the sewing process.
You get a measurement wrong, or it doesn’t look right. She tries it on and it doesn’t fit, or it doesn’t look right, or something went wrong in the construction process like cutting two pieces of the same side.
She cries and announces she is suing you. At the very least she wants the small fortune she spent on the fabric back, and then some. If you don’t have liability insurance, you can lose your shirt.
HOURS OF OPERATION
You will want to determine your hours of operation right from the get-go.
You don’t want people coming and going at all hours of the day or night interfering with your family time, or personal time.
Set limitations and boundaries for yourself and customers to follow so that everyone wins!
HOME OR OFFICE
No matter where you decide to operate your sewing business, you can still be professional. There are advantages to running a selling business from your home.
If you have kids you can work around them. You won’t need daycare unless you want it. You won’t have to pay rental fees for an office, and you can write your expenses off on income tax.
On the other hand, there are advantages to renting office space to run your sewing business. You can get out of the house. You can get away from your kids if that’s what you want or need.
You can separate your business from your personal life a lot easier. Whichever way you choose, it will still work. It’s totally up to you!
PRACTICAL SEWING SPACES
Setting up a sewing space is fun yet challenging at the same time. You will want to make sure you have the largest table that you can find.
I can’t tell you enough how hard it is on your back to cut out fabric on the floor. If you don’t have a large enough space on the table to cut the fabric out, your project (or rather the client’s project) will end up on the floor.
That should never be an option! Do you hear me? The floor is not an option! You will also want to pick a room that has great lighting because you need to see well.
It doesn’t matter how many lamps you put in your office, nothing replaces natural light. Lastly, you will need at least a couple desks for the multiple sewing machines you will have because that’s how many you need
You want to have a good serger at your disposal, as well as a single needle sewing machine. You may also want to have an industrial sewing machine as well as a leather sewing machine if at all possible.
Don’t forget the shelving. If you don’t have shelves you won’t be able to display your lovely notions. That means all your serger cones, patterns, fabric, and sewing supplies you use every day.
YOUR PRICING SYSTEM
Establish your pricing system right from the start. Don’t undercut yourself. Pay yourself what you’re worth and charge a living wage.
I don’t care who doesn’t like it when I say this but set an hourly wage as well as a project price. The way I do it is I charge a $25 dollar flat rate (per hour) because living isn’t cheap.
If you can’t make a living from your sewing business because you don’t charge enough, you won’t be doing it for long anyway. So, charge a wage that’s equivalent to what other people get working their jobs.
In fact, many people get a lot more than $25 an hour. But think of it this way, every hour you’re in your sewing room sewing for a client, you should be paid $25, or whatever you set your base wage at.
Maybe you’re reading this many years in the future. It better be much higher than that. You can have the option of charging hourly, or per project, or even double for rush jobs.
But if you charge per project you have to know exactly how many hours it’s going to take to complete that project. And that’s not an easy task to figure out how long it will take you.
Sometimes we just don’t know. Sometimes we need to write an estimate up for a client. Figuring out what to charge for a sewing business is not a perfect science either.
You will have to figure that out on your own. Every seamstress has to do this and that’s normal. Figure out what you need to live on; what your time is worth to you; what expenses you will have, and what you’re willing to put up with.
Then go from there. As an example, for what I charge, let’s look at the zipper I replaced in a leather jacket for a client. It was a difficult project. It took me three hours but I took my time.
I needed to. I charged $50 including a seven dollar zipper. Roughly I made $15 an hour. Not enough! But he was a friend so it was okay this time. You will want to figure out a living wage if this is something you’re considering doing.
Sewing alterations can be very rewarding and profitable only if you pay yourself what you’re worth.
COMPLAINTS AND REFUNDS
Yes, there will always be customer complaints. You can’t escape that. You will always have to give a refund at some point in time, and you may lose clients because of it.
It’s the name of the business and its to be expected. The best way to handle a complaint is by listening to the customer. Let them vent and hear them out. Never interrupt.
Always accept blame. And apologize, apologize, apologize. Give them a good deal so they will keep coming back. Never argue. Never blame them. And always wear a smile.
CONCLUSION
PRACTICE MAKES PERFECT
I hope you enjoyed this free course on replacing a zipper in a jacket. If you are working on your own project, let me know how it turned out.
Understand that it’s a learning curve. If it didn’t turn out, that’s perfectly okay. Don’t beat yourself up over it. Sometimes we just need to do it more than once.
Practice makes perfect.
The more we do something, the easier it will get and the faster we will get at completing it.
If you’ve decided to start your own sewing and alteration business, I hope this course has helped you become more confident at replacing zippers for all the clients that you will have in the future.
Doing alterations is rewarding and profitable if we set standards and values and hold to them. Replacing a zipper in a jacket is only one type of alteration you’ll be doing for clients, but it is more challenging.
If you start with something difficult like this, you can do anything. Many seamstresses avoid zippers, not because it’s too hard but because it’s intimidating and scary.
We hear that it’s hard so we avoid it. Now that you know how to replace a zipper in a jacket, I hope that fear is gone and you see the potential profit in this area.
To watch the video tutorial on Katfit Stitch, go KatFit Stitch Tutorial or Zipper Replacement.
Below is a gallery of pictures I took of the process I used when replacing a zipper in a few jackets that I’ve done.