Sewing Your Own wedding dress is not as hard as you think, and well worth the effort!
When I think back 30 years ago when I decided I was going to sew my own wedding dress, I didn’t really know what I was getting into.
I was a new sewer, and my skill level isn’t what it is today.
But that didn’t stop me.
I’m the kind of person that tries new things, no matter how hard or crazy it may seem.
I knew enough about sewing to feel confident that I would do a good job with sewing my wedding dress. I had been an assistant manager at a fabric store. I worked at a sewing factory when I got engaged.
So, I knew enough about sewing to start a project as big as a wedding dress.
I classed myself as a beginner at the time, however, I knew more and had more experience than the average person when it came to sewing.
But that didn’t mean I was perfect. I was far from being a perfect sewer 30 years ago, or even now. I made my share of mistakes back then and even today.
This is my story of how I sewed my own wedding dress. I hope it inspires anyone considering sewing the most beautiful dress you’ll ever wear.
How Things Have Changed
Things have changed a lot since 1988, the year I got married. Styles have changed. Fabric has changed. Sewing machines have changed. Even the way we sew has changed.
I think the biggest change that’s affected sewing wedding dresses is the style of them.
Back when I sewed my own wedding dress, big hair and poofy dresses were the norm. Great big bows found their places on dresses of all kinds, not just wedding dresses.
I remember choosing my Butterick pattern thinking of the many different ways that I would change the look of it.
It was both fun and exciting.
I’d highly recommend sewing your own wedding dress no matter what year you’re reading this. Styles can come and go. Fashion changes from year to year, but a wedding dress will always have one unique characteristic.
It will always be a special occasion gown. Usually long. Well, scratch that. It will always be some sort of formal gown even if it’s short. I’ve seen short wedding dresses from the 50s and 60s. They were very unique looking and interesting fashion statements.
It doesn’t matter whether it’s short or long; poofy or sleek; beige, pink, or a true white. A wedding dress will always have the characteristics of some sort of a fairytale look.
Because after all, it’s YOUR fairytale.
Step 1 – Choosing The Pattern
When I went to look for a wedding dress pattern, it wasn’t hard to choose. Butterick was all the rage back in 1988. It was a popular pattern company then, and it still is today.
You can read more about the different pattern companies through the following link, Top Five Pattern Companies.
Butterick patterns are easy enough to follow, yet look stylish. I found that with the Butterick 4647. The pattern I chose to go with.
I worked with a size 10 and adjusted areas that needed it.
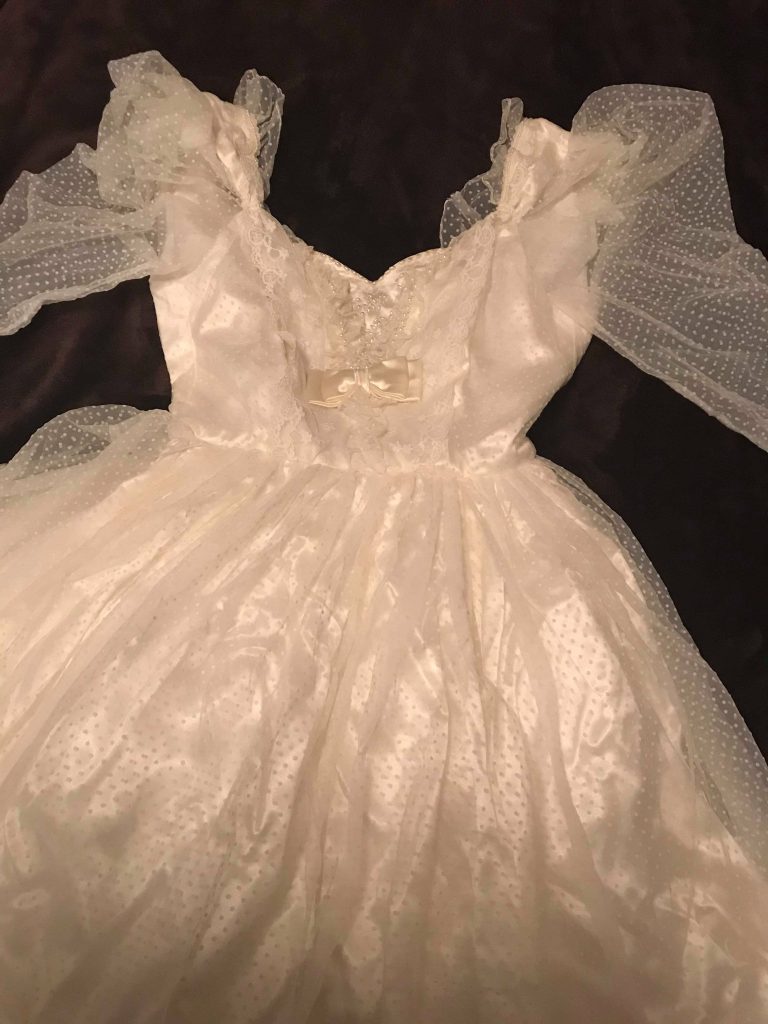
The pattern was a floor length dress with a semi-fitted lined bodice. It had ruffles inset into the front and back bodice.
The back had buttons loops on the bodice and a zipper closing on the skirt.
My wedding dress had three layers, lining, the underdressed, and the over skirt.
It had to have a train because in those days it was quite popular with traditional gowns and truthfully, its every little girl’s dream to have a train. Mine definitely had to have a gorgeous flowing train cascade behind me as I went down the aisle.
That was a given.
Wedding dress patterns in 1988 were expensive but not as expensive as they are today. My pattern was $7.75, and it was the best $7.75 I ever spent.
When you consider buying an already made gown, a measly $7.75 is nothing compared to the outrageous costs of wedding dresses these days.
Not only the cost of buying a wedding dress, but the cost of alterations is high as well. Women are spending more on alterations than the actual dress costs.
That’s an out right shame!
Sure, wedding dress fabric costs a lot of money, but nothing compares to how much ready made gowns cost today.
It is still cheaper to sew your own wedding dress than it is to buy. We’ll go into detail a little bit more later, but for now I just want to say that buying a $7.75 wedding dress pattern is well worth it.
And there are many beautiful patterns out there. It doesn’t matter what company you buy from as long as you stick to the big five pattern companies.
Step 2 – Choosing The Material
Choosing the right material for my wedding dress wasn’t difficult. As I said, I was the assistant manager of a fabric store for a few years so I was familiar with the different types of fabric I could use.
I knew what was cheap, yet beautiful.
I went with a white lining fabric for underneath my dress, as well as tulle and netting to poof it out.
For the main dress I chose a simple lining satin. A lot of people don’t even consider linings for wedding dress fabric. I guess it’s taboo because it’s considered a poor quality of satin.
But you know what, it was just as beautiful as any other bridal satin that you can buy. It was just cheaper. I had a few tricks of the trade because I was familiar with fabric stores and fabrics in general.
My overskirt was made with a Swiss Dot fabric. It was very popular back in 1988. Basically, Swiss Dot fabric is just the sheer material, almost like a netting, with little tiny polkadots all over.
I know, you might cringe at the thought of polka dots, but I loved it. I still love it even though it’s tucked away in my closet and I don’t take it out very often.
Just remember, when you choose the fabric for your wedding dress, you don’t always have to choose the most expensive bridal fabrics to look good.
Who wants to pay $3000 for wedding dress fabric when you can get it for $200.
By the way, I only spent $200 on fabric.
Now that’s a bargain!
Step 3 – Cutting It Out
Cutting out pattern pieces for a wedding dress is a huge challenge if you don’t have enough space. I lived in a small two-bedroom house with my sister at the time.
Our living room was only about 12 feet long.
If you can imagine, most of that space was taken up by a couch and a TV, and various other pieces of furniture.
What remained was a very small area for me in which to lay down my fabric and cut my pattern pieces out.
I didn’t even have a cutting table.
And when you cut out a wedding dress pattern you can’t just do it at the kitchen table. There’s way too much fabric. It slips and slides around.
I had no choice but to lay it down on the living room rug, section by section, piece by piece, until I was done.
I think cutting out my wedding dress pattern was probably the hardest part of sewing my wedding dress. Cutting out a pattern is time-consuming, backbreaking agony if you do it on the floor.
I wish I would have had a giant cutting table, but I had to improvise. You might have to improvise too. And that’s okay. You can sew wedding dresses in very small spaces, in an environment out of the ordinary. I can be done!
It just adds to the nostalgia of your gown
Looking back, I have fond memories of the entire experience. I didn’t want a dress off the rack. I wanted it to mean something. I wanted to look back 30, 40, 50 years later and find meaning in the dress that took me down the aisle to the man I love today.
Those memories are irreplaceable. You can’t buy that in a store-bought gown. Sure, you can make memories in any dress. That’s special too. But for me I wanted to craft it as if it represented my journey.
It did represent my journey.
It still does.
Like any journey, it’s not the actual place you go that is the most important, it’s the getting there that makes it memorable.
So cut your wedding dress pattern out wherever you have the space. It doesn’t have to be perfect. It doesn’t have to be ideal.
Just get the job done.
The faster you cut your pattern out the faster you get to sew your dress.
Just one word of caution. Always always measure twice, cut once. You want to be very sure of your sizing and layout BEFORE you cut. It’s very easy to waste material when you don’t plan out how you’re going to lay it down.
Some people obsess over this. But I just say to be cautious. You can spend a ridiculous amount of time placing each pattern piece over and over and then changing your mind. Doing it again and again until you find you’ve wasted several months on it, without much progress.
Do the best you can with placing each piece on the fabric so you have enough. But don’t obsess over it.
Worst-case scenario, if you screw up and cut it the wrong way or you run out of fabric, just go get some more.
It’s not that big of deal… Unless you make it one.
Step 4 – Fittings & Mockups
A lot of people spend too much time with fittings.
They sew entire muslin mockups just to find the right fit. My philosophy is, don’t do that. Don’t sew a entire wedding dress out of muslin if you don’t have to.
What are you going to do with this big ugly dress when you’re done? I can tell you this, muslin mockups are the biggest waste of time and money I’ve ever seen.
I have a great article on it if you want to read more by clicking the following link, Tissue Fitting vs Muslin Mockups.
There is a great alternative to muslin mockups, and that is the tissue fitting method. It’s what I did when I sewed my wedding gown.
All I did was pin together the tissue pattern pieces and place them on my body to see if they fit. Simple.
And really, the only places you’ll need to do a tissue fitting is the front and back bodice, waiste, and sleeves. The rest is not problematic because it’s dress. It drapes to the ground and the only thing you have to be concerned with is the link of the hem.
That can be done once the dress is already sewn together.
The real dress.
Not the dumb muslin mockup.
I didn’t even have someone to help me when I sold my dress. I fit each piece myself and sized it perfectly.
That goes to show you if you’re sewing solo, it still works. You might be surprised how much you can do all by yourself.
When it comes to sizing a wedding dress, do the best you can. Do one step at a time. Take your time. Make sure you have a full length mirror to work with, and you’re all set.
Once you have your sizing down pat, you can move on to the next step.
Step 5 – Construction
The actual construction of your wedding dress is the easy part. Most of it is just sewing straight lines.
It’s surprising how quickly a gown like this can come together.
I think it took me a total of two months to sew the entire thing.
I used the pattern as a guide in the process of constructing each piece. All patterns come with an instruction booklet that helps you understand the actual process of constructing the gown.
Each pattern is different in how it directs you to construct a dress.
My suggestion is to follow the pattern instructions exactly. You don’t want to veer off course by doing your own thing if you are not an advanced sewer.
It’s easy to get lost in the piles of material if you don’t follow the directions.
That’s how mistakes are made.
If you are an advanced sewer and are confident when making alterations to a specific pattern, then go for it. Make your wedding dress alterations by adding things or taking away sections of the pattern.
That’s what I did
I added a great big satin bow in the back. I added take up areas throughout the over skirt and satin bows all around the skirt.
I added a satin beaded cummerbun to the waistline as well.
I love the fact that nobody in the entire world had a dress like mine.
That made me feel special, and it still does when I look back at my wedding pictures.
When it comes to constructing a dress as big as a wedding gown there are a few things that you need to know. Work in sections.
When one section is complete, set it aside.
I remember step-by-step hanging each piece like a puzzle. I finished the front bodice. Then I finished the back bodice. Then I put them together. Then I finished the sleeves. Then I sewed them to the bodice.
I constructed the skirt and hung it separately until I did the waist.
Step-by-step, piece by piece, I put my wedding gown together. Just like my life. Piece by piece, little by little I got to the point where I was at. I got to the point of getting ready to be married.
And now, looking back, I realize there’s something special about sewing a wedding dress. It represents the building blocks of life. Like a puzzle. Every thread, every bead, every pricked finger went into building the dress. My dress!
Little did I know that the next 30 years of my life would be a construction zone like my gown.
I’m happy to say it was well worth it!
Step 6 – Making It My Own
As you sew your wedding gown, it starts to take on its own personality. Mine did. It was like a second version of me.
If I didn’t like a pattern piece or ruffle, I took it out.
If I wanted to add an embellishment to the bodice, I did it. I made it my own. You can make your gown your own.
Even if you are a beginner, and your sewing skills are not very good, you can still make a wedding gown your own. You don’t have to be afraid of trying different things with it.
Once the dress has its main shape, and the major sewing is done, you can decorate it any way you want.
And that’s what we’re talking about. We’re talking about decorating a wedding dress. That’s how you make it your own. Once it’s already made up, you can add little things to it like bows, beads, pearls, lace, and sequins.
I love the decorating part.
If you’re good at crafts, you can decorate a wedding dress. It’s not as hard as it may seem.
Just be creative!
Step 7 – Embellishments
Nowadays, you can get a lot of beautiful embellishments.
You can buy rhinestones by the meter. You can buy lace inserts. You can buy pearls by the meter.
Adding embellishments to a wedding gown is the same thing as decorating it. You want to find pretty things to put on it and those are called embellishments.
They had these back in the 80s as well.
If you don’t want preset embellishments like lace roses or embroidered roses, you can do stitching by hand.
This is what I did. I hand sewed pearl beading onto my bodice. I always dreamt of having a wedding dress with tiny little beads shaped into unique patterns, so that’s what I did.
Once my dress was fully constructed, I made up a pattern for beading and transferred it to the satin on my front bodice.
Once I had the pattern set out, I began the painstaking hours of sewing the intricate beadwork of my bodice.
I was so proud of this.
It was my own unique design.
To me, I found great value in the hours I put into hand sewing each bead on. Most people would never do this. Most people would think that it’s too hard.
They might not even try.
They might purchase an already beaded appliqué and just sew that on. If you want to do that it’s perfectly fine. However you get your beadwork done, is up to you. But you may not even want to put beadwork on your dress.
That’s the beauty of sewing your own wedding dress. YOU are in charge of what it will look like. And that’s power.
I love power!
When it’s out of my hands I start to panic. I think I would’ve panicked if I would’ve bought an already made gown from a store.
If I wasn’t in charge of what it looked like, I would have felt insecure wearing it. I probably would’ve changed it here and there anyway, just the same as I would if I were sewing it.
That’s just me.
I love being unique and different from everybody else.
I express myself through my clothing.
Why not a wedding dress.
Step 8 – Final Fittings
The final fitting isn’t as important as everybody thinks.
When you sew your own wedding dress and it’s near completion, you already know if fits. You’ve spent the time doing the tissue fitting, trying each piece on at a time as you sewed the dress, that you’re confident it fits you.
Final fittings are almost irrelevant when you sew it yourself.
But that doesn’t mean you won’t try it on a gazillion times. I did. I think every bride would. It’s the excitement that makes you do it. It’s the pride of a job well done.
It makes you feel special.
Trying on your gown over and over is definitely something that you need to do. Not because you want to make sure it fits. You KNOW it fits.
But because you’re excited to go down the aisle wearing a beautiful gown that you created with your own two hands.
Step 9 – The Veil
I loved sewing my veil.
It was the prettiest thing I’ve ever sewn, and the easiest thing I’ve ever sewn.
All I used was basic white tulle. I bought a hairpiece and hand sewed it to the comb with invisible thread.
It was easy easy.
I sewed pearl beading into it on the head piece and all around the sides.
Back in the 80s, as you remember, big hair was in. So, what I wanted to do was incorporate that look into my veil. A big poofy headpiece was added on top of the comb with preset embroidered flowers and pearl strands.
It was my own unique design, but looked very much like Vogue bridal wear of the 80’s.
I edged my veil in a very unique way. All I did was sew a narrow zigzag right on the edge of the tulle. The end result was a beautiful scalloped edging that looked like I hand sewed it.
I tell everybody I can about my little secret. If you want a scalloped edge on tulle, just zigzag it. It will fold into a beautiful design.
Step 10 – Preserving
I don’t know what all the fuss is about when women consider preserving their wedding dress after the wedding.
I’ve been told all kinds of things, like your wedding dress will turn yellow over time if you don’t preserve it property.
I’ve been told moths will destroy it if you don’t preserve it properly. That might be true but who leaves it hanging in their closet without a garment bag. And who has moths inside the house nowadays.
Maybe back in the 1800s when they had to store their gowns in a box in the attic, moths were a problem, but not as much anymore.
Maybe if you live on a farm, mice might get in and destroy your gown. You might want to keep your wedding dress in a plastic bin so rodents won’t get in.
But for the most part, you don’t really have to get your wedding dress preserved to the point of spending huge amounts of money.
You don’t have to get it vaccum packed if you don’t want to.
I didn’t.
I wanted to be able to open up the plastic bin I stored it in and try it on like I did on many anniversaries.
My wedding dress has lasted 30 years without going yellow, or been eaten by moths, or destroyed by mice.
And we’ve lived in many old farmhouses where mice run rampid.
Preserve your wedding dress however you want. If that means storing it in a bin in your closet, then do it. If that means keeping it in a garment bag in a part of your closet that is not exposed to light, heat, moths, rodents, or elements, then just keep it there.
If you want to spend the money to get it preserved with the vacuum packed method, then that is up to you, but certainly not necessary.
Trust me, my wedding dress is just fine going on 30 years now.
Memories
The best part of sewing my own wedding dress is the memories that I made during the process of constructing the dress.
I remember each time my fiancée would come over trying to peek at the dress, teasing me when he came over, I’d always scurry around and hide each piece so we didn’t see any of it until the wedding day.
It was fun.
But there were also those times that I cried my eyes out because nothing was going right. That was part of the journey.
I enjoyed the journey so much.
I loved sewing each little bead on as it represented a micro-moment in my life.
When the sewing machine balled up and the tension went out of whack, I felt like giving up. That was a reflection of how many times I would feel like giving up my marriage.
Those bad days happen to everybody, but I’m so glad I had a prototype to learn from. The making of my wedding gown. It helped me understand that my life was not going to be perfect, just like my dress was not perfect.
It taught me that times will be tough…and still be okay.
It taught me how to get through the good, the bad, and the ugly.
It’s so strange how sewing a wedding dress can teach you all these things, even before you actually get married.
And now, 30 years and counting, I admire the multiple lessons I learned while making my own wedding gown, and how it seemed to mirror my future with the man I love.
Vintage Value
I don’t think you can put a value on a homemade wedding gown.
Though my wedding gown is considered vintage because it’s 30 years old, the monetary value is not very high.
The value of my wedding dress is found in the memories behind the making of it.
If you consider sewing your own wedding gown, just remember that years down the road, it won’t be worth much, only to you.
But that’s all you need.
I would never ever consider selling my wedding gown. I don’t care if somebody offered me a million dollars for it. I would never take it.
You can’t put a price on it!
Things I’ve Learnt
I’ve learned a lot of things by sewing my own wedding gown.
Maturity is number one.
I matured as a sewer.
I gained experience as a seamstress.
I moved up the ladder to become an advanced sewer.
But that’s not the only way I matured. I grew from a young naïve bride, to a mature married woman.
Through the stages of my garment that reflected my life over the years, I matured into a woman of strength and character who knows who she is, and knows how to get there.
That’s me.
I’ve learned that giving up is not an option.
I learned to persevere no matter how hard life gets, no matter how difficult the task. I will not quit!
I learned this from sewing my own wedding dress, as thoughts of difficulty danced through my head while struggling to construct my own gown.
I persevered.
And because of it, I was blessed with a beautiful thing.
Conclusion
In conclusion, I just want to say that if you are considering sewing your own wedding dress, remember that it’s not as hard as people make it out to be.
It’s time-consuming, yes.
But it’s well worth it.
I hope you decide to sew your own wedding gown, and you experience what I did while making it. I hope you learn the lessons that I did, and I hope you understand that life is very much like the sewing of a wedding dress.
I hope you decide to take on this venture.
May your marriage be truly blessed!
If you decide to sew your own wedding gown, I’d love to see some pictures. Go ahead and post them in the comments section.
HAPPY SEWING!
Check out my fun Youtube video about making my own wedding dress.
Supplies You May Need To Sew Your Own Wedding Dress
By the way, Crunchy Menopause is a review site that receives compensation from ShareASale, Amazon Services LLC Associates Program, eBay, and other affiliate networks whose products I review. That means if you purchase something through one of my affiliate links, I get a little bit of money.